

Mobile App Prototype Testing Can Be Done Manually Or It Can Be What?
Building a document scanner with OpenCV can be accomplished in just three simple steps:
- Step 1: Detect edges.
- Step 2: Use the edges in the image to find the contour (outline) representing the piece of paper being scanned.
- Step 3: Apply a perspective transform to obtain the top-down view of the document.
Really. That's it.
Only three steps and you're on your way to submitting your own document scanning app to the App Store.
Sound interesting?
Read on. And unlock the secrets to build a mobile scanner app of your own.
![]()
Looking for the source code to this post?
Jump Right To The Downloads Section OpenCV and Python versions:
This example will run on Python 2.7/3+ and OpenCV 2.4/3+
How To Build a Kick-Ass Mobile Document Scanner in Just 5 Minutes
Last week I gave you a special treat — my very own transform.py module that I use in all my computer vision and image processing projects. You can read more about this module here.
Whenever you need to perform a 4 point perspective transform, you should be using this module.
And you guessed it, we'll be using it to build our very own document scanner.
So let's get down to business.
Open up your favorite Python IDE, (I like Sublime Text 2), create a new file, name it scan.py , and let's get started.
# import the necessary packages from pyimagesearch.transform import four_point_transform from skimage.filters import threshold_local import numpy as np import argparse import cv2 import imutils # construct the argument parser and parse the arguments ap = argparse.ArgumentParser() ap.add_argument("-i", "--image", required = True, help = "Path to the image to be scanned") args = vars(ap.parse_args()) Lines 2-7 handle importing the necessary Python packages that we'll need.
We'll start by importing our four_point_transform function which I discussed last week.
We'll also be using the imutils module, which contains convenience functions for resizing, rotating, and cropping images. You can read more about imutils in my this post. To install imutils , simply:
$ pip install --upgrade imutils
Next up, let's import the threshold_local function from scikit-image. This function will help us obtain the "black and white" feel to our scanned image.
Note (15 January 2018): The threshold_adaptive function has been deprecated. This post has been updated to make use of threshold_local .
Lastly, we'll use NumPy for numerical processing, argparse for parsing command line arguments, and cv2 for our OpenCV bindings.
Lines 10-13 handle parsing our command line arguments. We'll need only a single switch image, --image , which is the path to the image that contains the document we want to scan.
Now that we have the path to our image, we can move on to Step 1: Edge Detection.
Step 1: Edge Detection
The first step to building our document scanner app using OpenCV is to perform edge detection. Let's take a look:
# load the image and compute the ratio of the old height # to the new height, clone it, and resize it image = cv2.imread(args["image"]) ratio = image.shape[0] / 500.0 orig = image.copy() image = imutils.resize(image, height = 500) # convert the image to grayscale, blur it, and find edges # in the image gray = cv2.cvtColor(image, cv2.COLOR_BGR2GRAY) gray = cv2.GaussianBlur(gray, (5, 5), 0) edged = cv2.Canny(gray, 75, 200) # show the original image and the edge detected image print("STEP 1: Edge Detection") cv2.imshow("Image", image) cv2.imshow("Edged", edged) cv2.waitKey(0) cv2.destroyAllWindows() First, we load our image off disk on Line 17.
In order to speedup image processing, as well as make our edge detection step more accurate, we resize our scanned image to have a height of 500 pixels on Lines 17-20.
We also take special care to keep track of the ratio of the original height of the image to the new height (Line 18) — this will allow us to perform the scan on the original image rather than the resized image.
From there, we convert the image from RGB to grayscale on Line 24, perform Gaussian blurring to remove high frequency noise (aiding in contour detection in Step 2), and perform Canny edge detection on Line 26.
The output of Step 1 is then shown on Lines 30 and 31.
Take a look below at the example document:
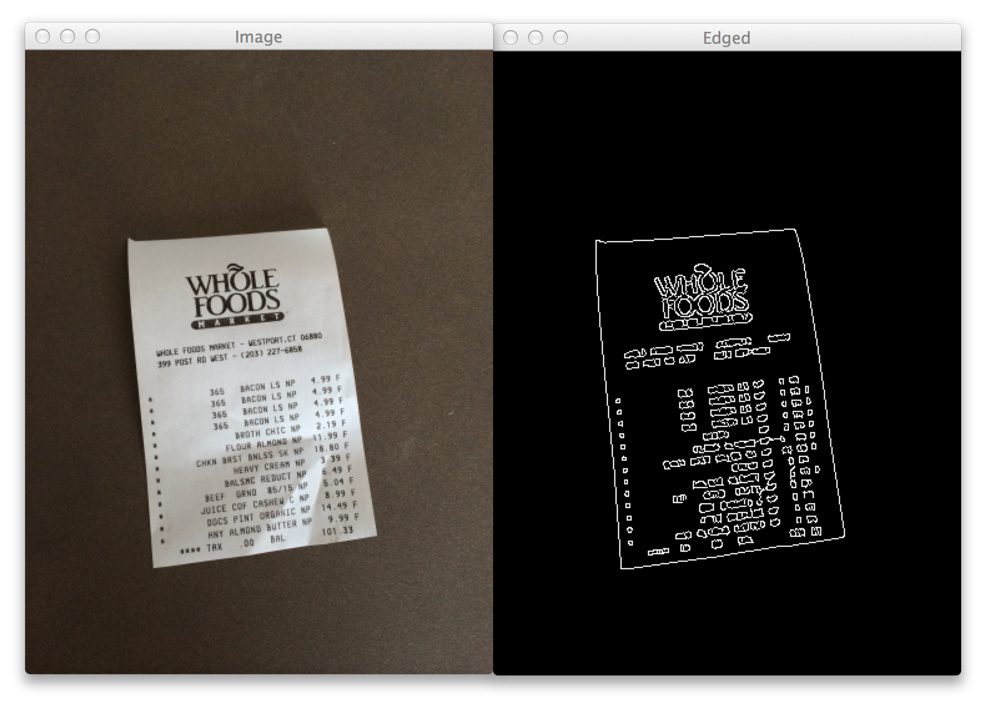
On the left you can see my receipt from Whole Foods. Notice how the picture is captured at an angle. It is definitely not a 90-degree, top-down view of the page. Furthermore, there is also my desk in the image. Certainly this is not a "scan" of any means. We have our work cut out for us.
However, on the right you can see the image after performing edge detection. We can clearly see the outline of the receipt.
Not a bad start.
Let's move on to Step 2.
Step 2: Finding Contours
Contour detection doesn't have to be hard.
In fact, when building a document scanner, you actually have a serious advantage…
Take a second to consider what we're actually building.
A document scanner simply scans in a piece of paper.
A piece of paper is assumed to be a rectangle.
And a rectangle has four edges.
Therefore, we can create a simple heuristic to help us build our document scanner.
The heuristic goes something like this: we'll assume that the largest contour in the image with exactly four points is our piece of paper to be scanned.
This is also a reasonably safe assumption — the scanner app simply assumes that the document you want to scan is the main focus of our image. And it's also safe to assume (or at least should be) that the piece of paper has four edges.
And that's exactly what the code below does:
# find the contours in the edged image, keeping only the # largest ones, and initialize the screen contour cnts = cv2.findContours(edged.copy(), cv2.RETR_LIST, cv2.CHAIN_APPROX_SIMPLE) cnts = imutils.grab_contours(cnts) cnts = sorted(cnts, key = cv2.contourArea, reverse = True)[:5] # loop over the contours for c in cnts: # approximate the contour peri = cv2.arcLength(c, True) approx = cv2.approxPolyDP(c, 0.02 * peri, True) # if our approximated contour has four points, then we # can assume that we have found our screen if len(approx) == 4: screenCnt = approx break # show the contour (outline) of the piece of paper print("STEP 2: Find contours of paper") cv2.drawContours(image, [screenCnt], -1, (0, 255, 0), 2) cv2.imshow("Outline", image) cv2.waitKey(0) cv2.destroyAllWindows() We start off by finding the contours in our edged image on Line 37. We also handle the fact that OpenCV 2.4, OpenCV 3, and OpenCV 4 return contours differently on Line 38.
A neat performance hack that I like to do is actually sort the contours by area and keep only the largest ones (Line 39). This allows us to only examine the largest of the contours, discarding the rest.
We then start looping over the contours on Line 42 and approximate the number of points on Line 44 and 45.
If the approximated contour has four points (Line 49), we assume that we have found the document in the image.
And again, this is a fairly safe assumption. The scanner app will assume that (1) the document to be scanned is the main focus of the image and (2) the document is rectangular, and thus will have four distinct edges.
From there, Lines 55 and 56 display the contours of the document we went to scan.
And now let's take a look at our example image:
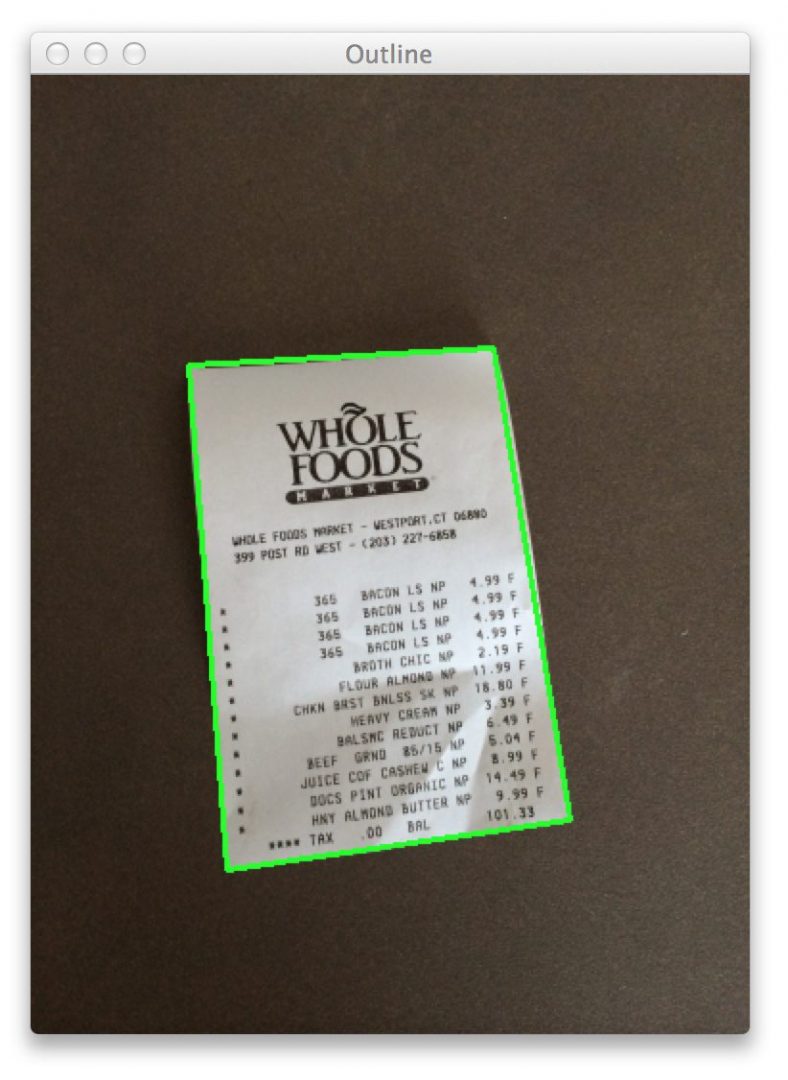
As you can see, we have successfully utilized the edge detected image to find the contour (outline) of the document, illustrated by the green rectangle surrounding my receipt.
Lastly, let's move on to Step 3, which will be a snap using my four_point_transform function.
Step 3: Apply a Perspective Transform & Threshold
The last step in building a mobile document scanner is to take the four points representing the outline of the document and apply a perspective transform to obtain a top-down, "birds eye view" of the image.
Let's take a look:
# apply the four point transform to obtain a top-down # view of the original image warped = four_point_transform(orig, screenCnt.reshape(4, 2) * ratio) # convert the warped image to grayscale, then threshold it # to give it that 'black and white' paper effect warped = cv2.cvtColor(warped, cv2.COLOR_BGR2GRAY) T = threshold_local(warped, 11, offset = 10, method = "gaussian") warped = (warped > T).astype("uint8") * 255 # show the original and scanned images print("STEP 3: Apply perspective transform") cv2.imshow("Original", imutils.resize(orig, height = 650)) cv2.imshow("Scanned", imutils.resize(warped, height = 650)) cv2.waitKey(0) Line 62 performs the warping transformation. In fact, all the heavy lifting is handled by the four_point_transform function. Again, you can read more about this function in last week's post.
We'll pass two arguments into four_point_transform : the first is our original image we loaded off disk (not the resized one), and the second argument is the contour representing the document, multiplied by the resized ratio.
So, you may be wondering, why are we multiplying by the resized ratio?
We multiply by the resized ratio because we performed edge detection and found contours on the resized image of height=500 pixels.
However, we want to perform the scan on the original image, not the resized image, thus we multiply the contour points by the resized ratio.
To obtain the black and white feel to the image, we then take the warped image, convert it to grayscale and apply adaptive thresholding on Lines 66-68.
Finally, we display our output on Lines 72-74.
Python + OpenCV document scanning results
And speaking of output, take a look at our example document by running the script:
$ python scan.py --image images/receipt.jpg
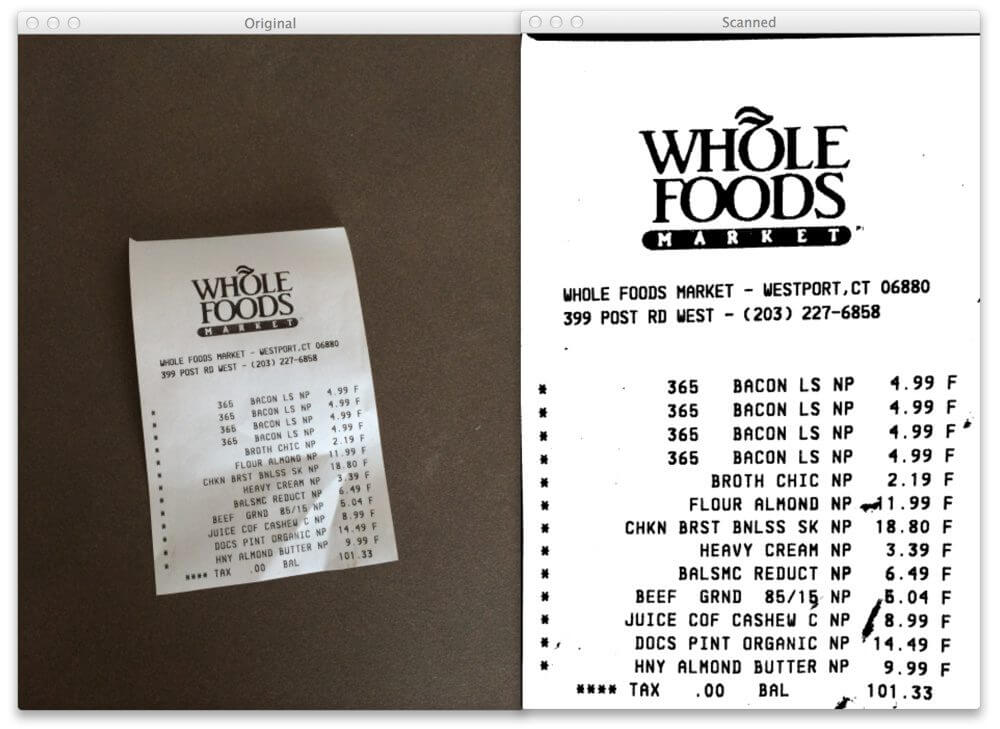
On the left we have the original image we loaded off disk. And on the right, we have the scanned image!
Notice how the perspective of the scanned image has changed — we have a top-down, 90-degree view of the image.
And thanks to our adaptive thresholding, we also have a nice, clean black and white feel to the document as well.
We have successfully built our document scanner!
All in less than 5 minutes and under 75 lines of code (most of which are comments anyway).
More Examples
The receipt example was all well and good.
But will this approach work for normal pieces of paper?
You bet!
I printed out page 22 of Practical Python and OpenCV, a book I wrote to give you a guaranteed quick-start guide to learning computer vision:
$ python scan.py --image images/page.jpg
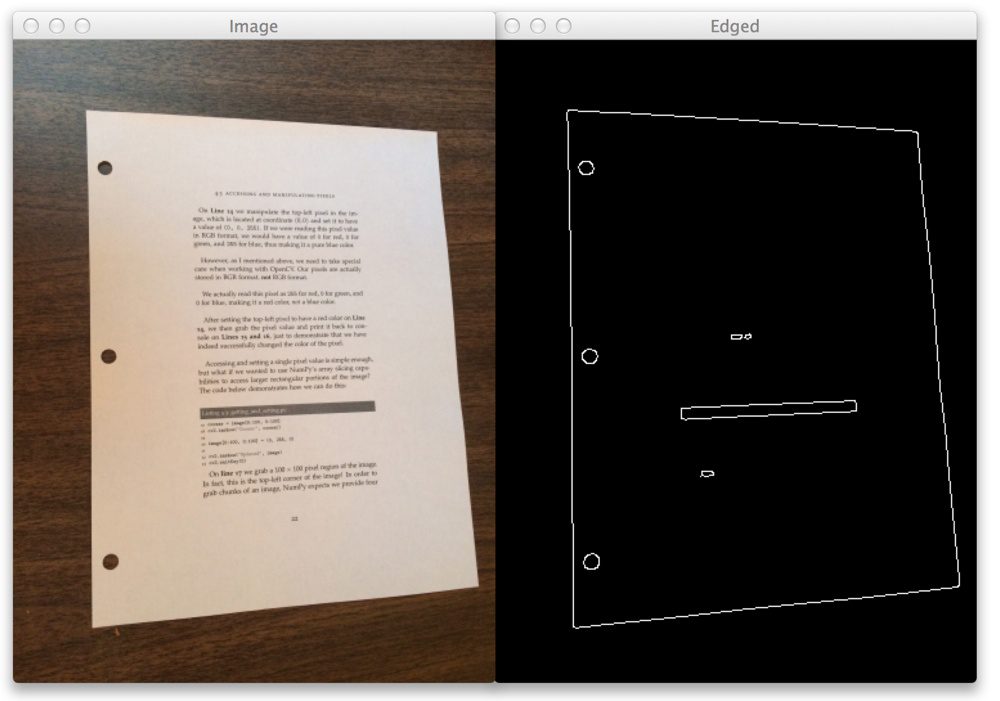
You can see the original image on theleft and the edge detected image on theright.
Now, let's find the contour of the page:
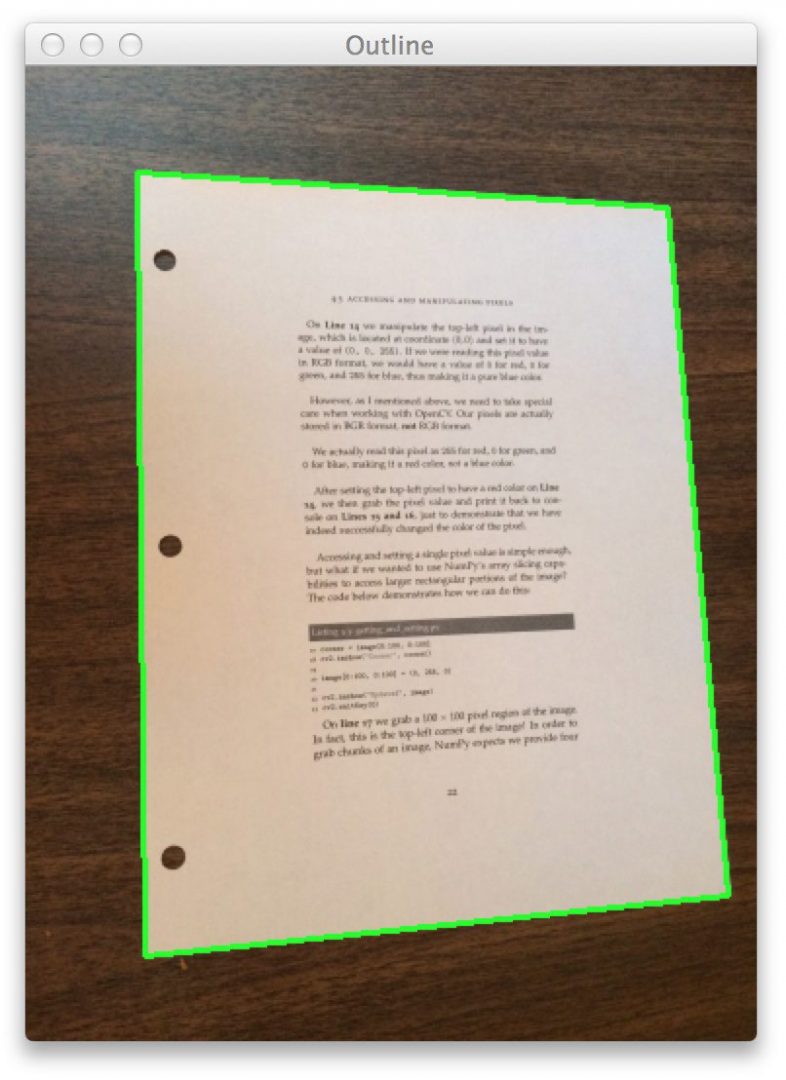
No problem there!
Finally, we'll apply the perspective transform and threshold the image:
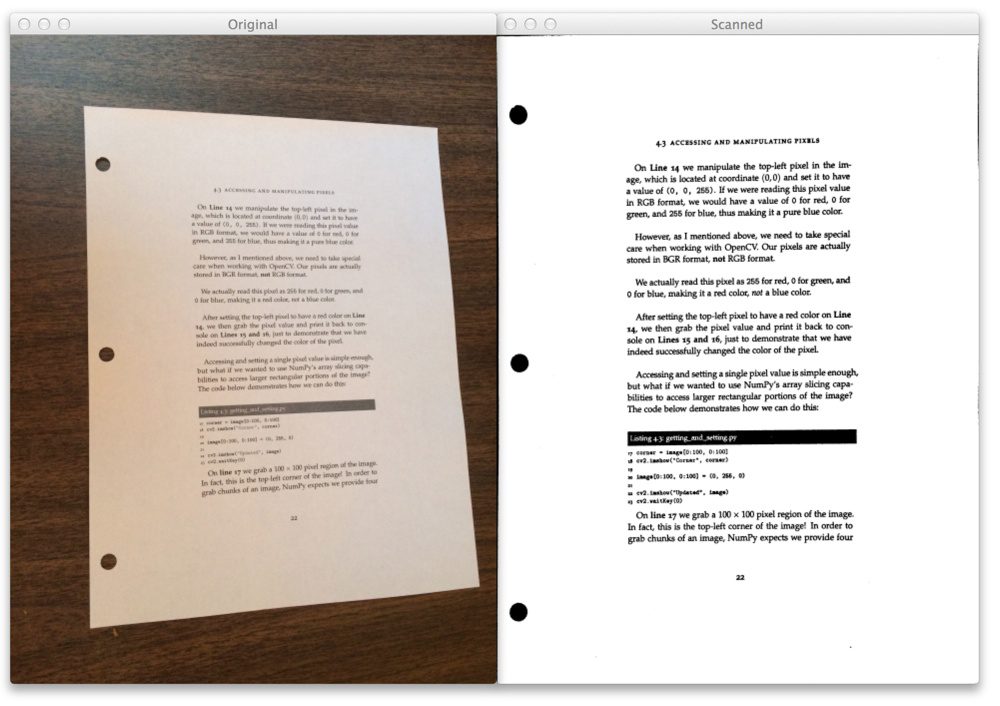
Another successful scan!
Where to Next?
Now that you have the code to build a mobile document scanner, maybe you want to build an app and submit to the App Store yourself!
In fact, I think you should.
It would be a great learning experience…
Another great "next step" would be to apply OCR to the documents in the image. Not only could you scan the document and generate a PDF, but you would be able to edit the text as well!
What's next? I recommend PyImageSearch University.
Course information:
28 total classes • 39h 44m video • Last updated: 10/2021
★★★★★ 4.84 (128 Ratings) • 3,000+ Students Enrolled
I strongly believe that if you had the right teacher you could master computer vision and deep learning.
Do you think learning computer vision and deep learning has to be time-consuming, overwhelming, and complicated? Or has to involve complex mathematics and equations? Or requires a degree in computer science?
That's not the case.
All you need to master computer vision and deep learning is for someone to explain things to you in simple, intuitive terms. And that's exactly what I do. My mission is to change education and how complex Artificial Intelligence topics are taught.
If you're serious about learning computer vision, your next stop should be PyImageSearch University, the most comprehensive computer vision, deep learning, and OpenCV course online today. Here you'll learn how to successfully and confidently apply computer vision to your work, research, and projects. Join me in computer vision mastery.
Inside PyImageSearch University you'll find:
- ✓ 28 courses on essential computer vision, deep learning, and OpenCV topics
- ✓ 28 Certificates of Completion
- ✓ 39h 44m on-demand video
- ✓ Brand new courses released every month , ensuring you can keep up with state-of-the-art techniques
- ✓ Pre-configured Jupyter Notebooks in Google Colab
- ✓ Run all code examples in your web browser — works on Windows, macOS, and Linux (no dev environment configuration required!)
- ✓ Access to centralized code repos for all 400+ tutorials on PyImageSearch
- ✓ Easy one-click downloads for code, datasets, pre-trained models, etc.
- ✓ Access on mobile, laptop, desktop, etc.
Click here to join PyImageSearch University
Summary
In this blog post I showed you how to build a mobile document scanner using OpenCV in 5 minutes and under 75 lines of Python code.
Document scanning can be broken down into three distinct and simple steps.
The first step is to apply edge detection.
The second stepis to find the contours in the image that represent the document we want to scan.
And the final step is to apply a perspective transform to obtain a top-down, 90-degree view of the image, just as if we scanned the document.
Optionally, you can also apply thresholding to obtain a nice, clean black and white feel to the piece of paper.
So there you have it.
A mobile document scanner in 5 minutes.
Excuse me while I call James and collect my money…
Did You Like this Post?
Hey, did you enjoy this post on building a mobile document scanner?
If so, I think you'll like my book, Practical Python and OpenCV.
Inside you'll learn how to detect faces in images, recognize handwriting, and utilize keypoint detection and the SIFT descriptors to build a system to recognize the book covers!
Sound interesting?
Just click here and pickup a copy.
And in a single weekend you'll unlock the secrets the computer vision pros use…and become a pro yourself!

Download the Source Code and FREE 17-page Resource Guide
Enter your email address below to get a .zip of the code and a FREE 17-page Resource Guide on Computer Vision, OpenCV, and Deep Learning. Inside you'll find my hand-picked tutorials, books, courses, and libraries to help you master CV and DL!
Mobile App Prototype Testing Can Be Done Manually Or It Can Be What?
Source: https://www.pyimagesearch.com/2014/09/01/build-kick-ass-mobile-document-scanner-just-5-minutes/
Posted by: morrismenced.blogspot.com
0 Response to "Mobile App Prototype Testing Can Be Done Manually Or It Can Be What?"
Post a Comment